Modeling Lab
Recreating ILLIT’s ‘You’re Under Arrest’ in Blender: A 12-Second Short
I wanted to take twelve seconds of ILLIT’s “You’re Under Arrest” and restage them with Usagi, Chiikawa, Hachiware, and Momonga in Blender. The finished Short plays the original MV inside a TV above my 3D recreation, so differences in a glance, a camera move, or a hand touching a prop are immediately visible.
The useful part of this project was working through those differences: a cutter that did not read as being held, a diner pose that needed a stronger profile, and a floor that flickered between frames. This breakdown shows the actual Blender controls behind the corrections, with saved before-and-after renders and screenshots from the production files.
Project setup and source versions
| Blender | 4.5.15 LTS, confirmed in the production render logs |
|---|---|
| Video reference | HYBE LABELS / ILLIT, “You’re Under Arrest” Official MV, 0:00–0:12; working reference footage: 1280 × 720 |
| Starting 3D assets | My existing four-character ILLIT scene, illit_mv26_v1, copied into a new twelve-second project |
| Final project revision | illit_story12_floor_v5: the floor-stability correction, retaining the revised wire shot and the approved diner v2 footage |
| Workflow | Blender scenes, rigs and camera animation; Python-assisted scene construction and keyframing; final video compositing. The rooftop uses an AI-cleaned photographic plate. |
| Finished output | 1080 × 1920 · 60 fps · 12 seconds · 720 frames |
The MV is identified by its official source and time range. v5 is my Blender project revision, not a release number for the music video. Interface screenshots were captured by reopening the saved production files for this article.
Watch my finished 12-second Short on YouTube → Then come back to the wire-cutting and diner shots: those are where the changes are easiest to spot.
Start with the actions a viewer must understand
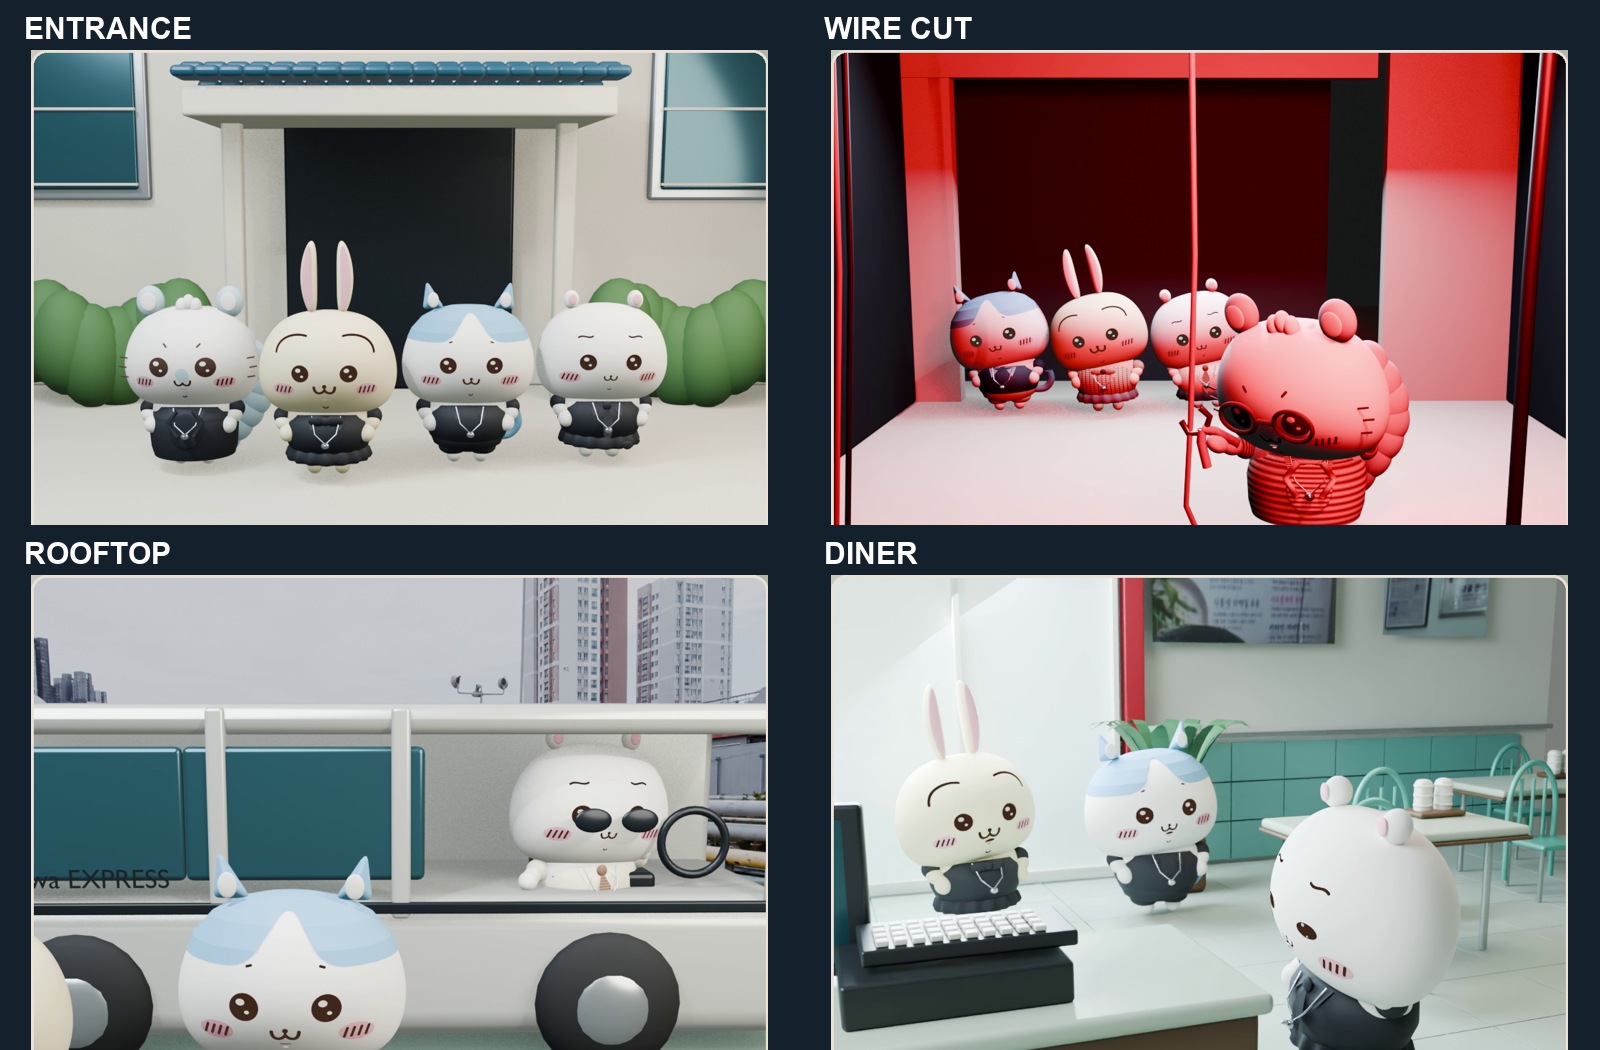
I used the original music video’s first twelve seconds as the reference. Before adding detail, I divided the work into four environments and a short portrait insert. Each cut needed one clear visual job.
| Approximate time | Shot | What must read clearly |
|---|---|---|
| 0–2.48 s | Four friends at the entrance | The group, the clothes, and the gradual approach |
| 2.48–3 s | Usagi portrait | A deliberate close-up rather than an accidental crop |
| 3–6.47 s | Wire-cutting room | Momonga’s gaze, paw, cutter, and working cable |
| 6.47–9.83 s | Rooftop parking and van | The group’s positions and the driver reveal |
| 9.83–12 s | Diner | Chiikawa’s side-facing performance and the friends behind |
For your own project, make this table before polishing the models. Write down who is in front, who is behind, which way the performer looks, where the action happens, and when the camera changes. A screenshot with those five notes is more useful than a vague instruction to “make it feel like the reference.”
Keep the character proportions, then adapt the action
I reused the existing character models and rigs, dressed them for their roles, and adjusted their acting for the shots. Their large heads and short limbs are part of the design. A human performer’s reach does not transfer directly to that silhouette.
The working solution was to bring the action within reach: move the prop, adjust the shoulder and elbow, turn the body, and use the camera to make the contact visible. In the revised wire shot, the arm solution stays within the original upper-arm and forearm lengths. The paw reaches sideways, outside the outline of the head, so the tool is not lost against the face.
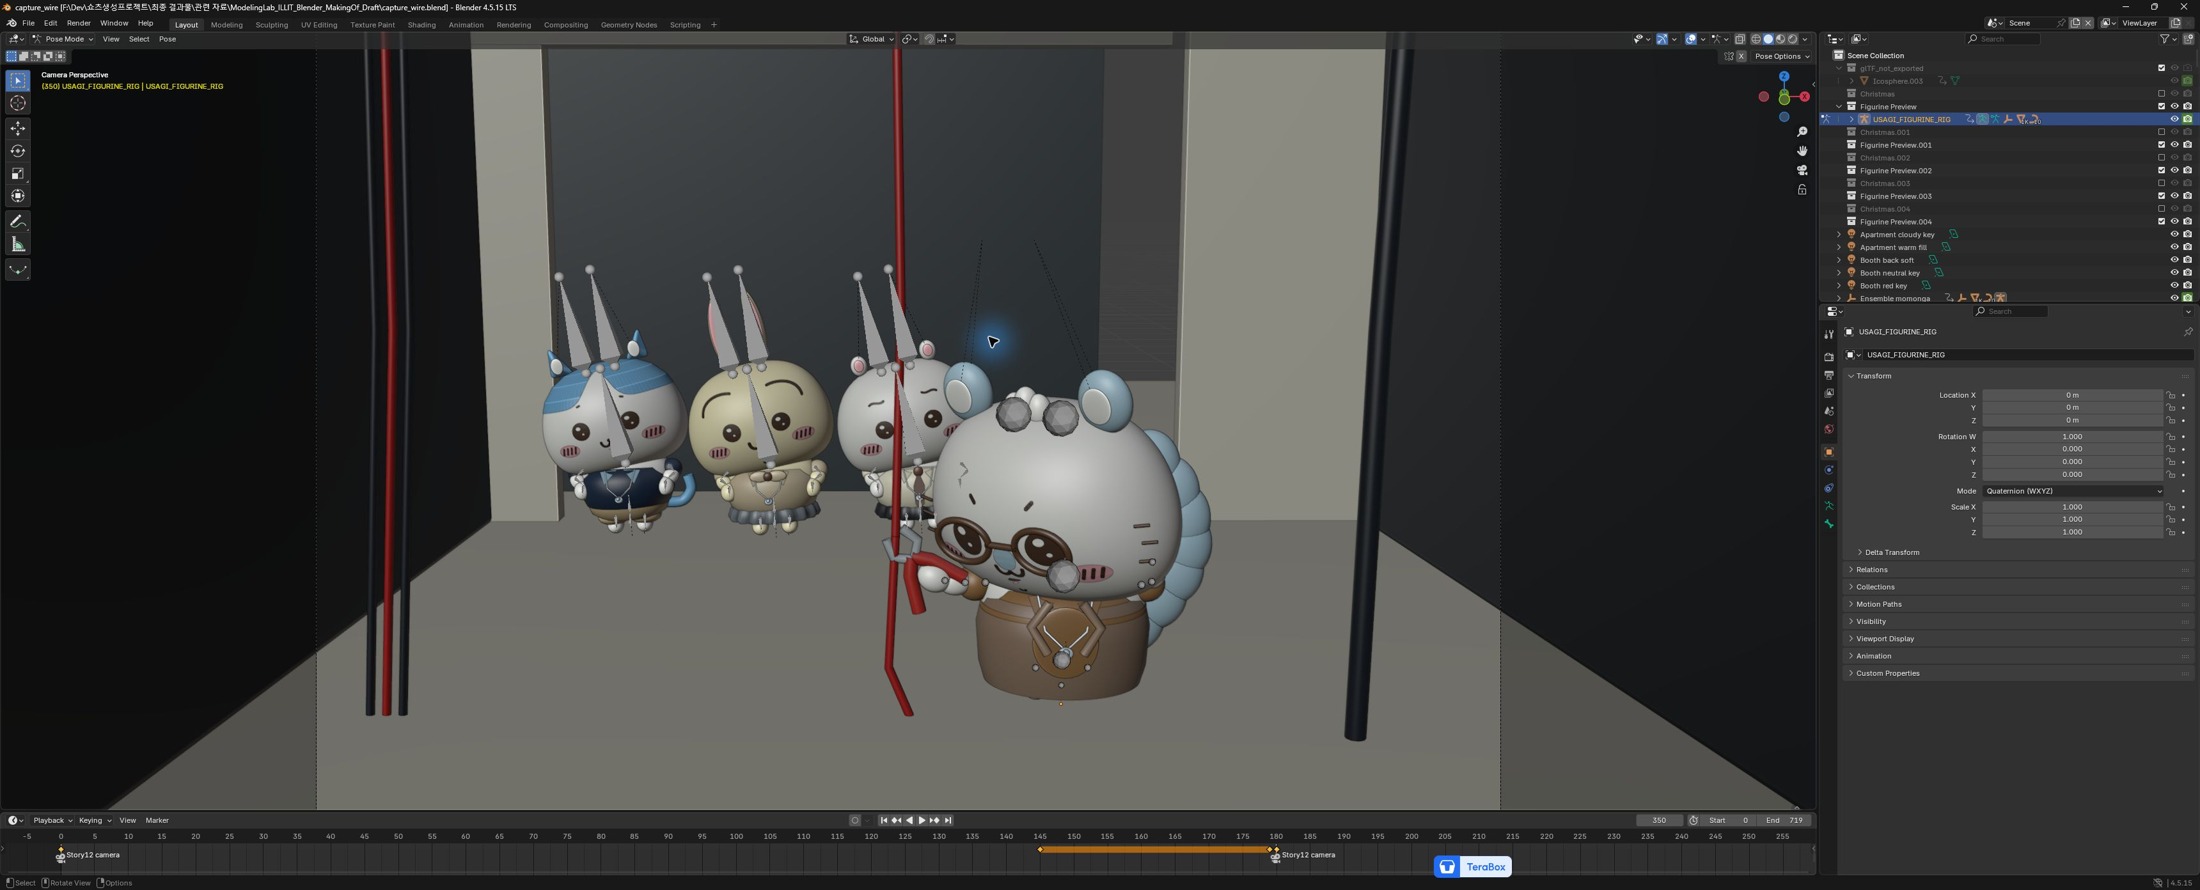
A useful first test: pose one character holding one prop. Check a front view, a side view, and the actual shot camera. If contact only works from one accidental angle, fix the relationship before animating the rest of the scene.
The wire shot: make the paw, tool, and cable agree
The early version put a large control box in front of the group. Momonga faced the viewer, while the surrounding cables did not clearly explain the action. It had the ingredients of the reference, but the staging was confusing.
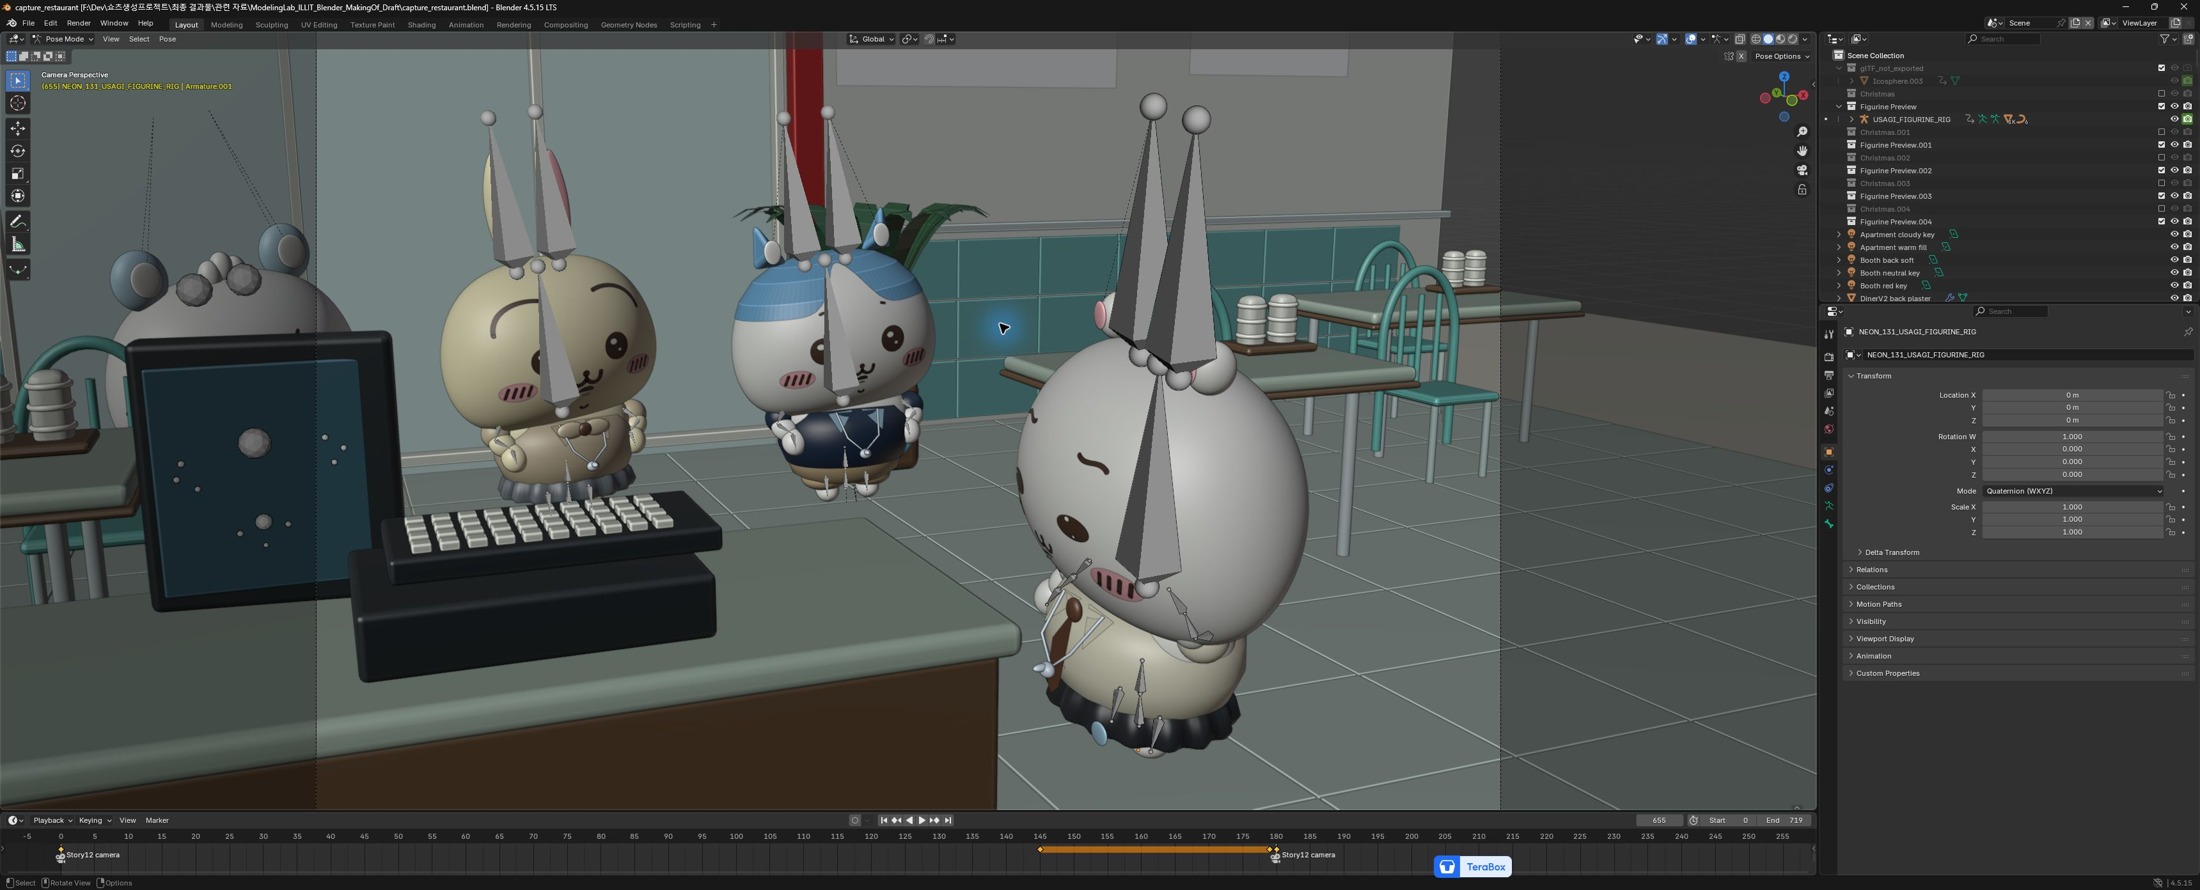
I removed the mistaken control box and its buttons. The three friends were regrouped in the rear doorway, while Momonga became the clear foreground performer. I then put the cutter at the actual paw and parented its grip to the hand bone, preserving its world placement. The red working cable was repositioned to meet the cutter jaws.
That connection matters during movement: a tool animated independently can drift even when a still frame looks acceptable. With the grip following the hand, I could animate the jaws locally and make the lower section of the cut cable drop afterward.
The Blender feature behind the fix: bone parenting
The cutter is a small hierarchy: a grip object holds the two handle pieces and two steel jaws. The grip follows the character’s hand bone; the jaw pieces have their own closing rotation. This separates “where the hand carries the tool” from “how the tool closes.”
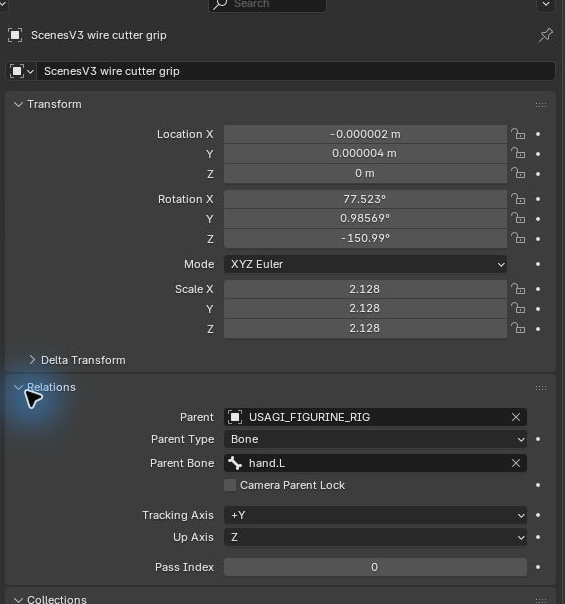
- Select the cutter’s grip object and inspect Object Properties → Relations.
- Assign the character armature as the parent, use Bone parenting, and target the working hand bone—in this file,
hand.L. Preserve the grip’s world placement while assigning the parent so it does not jump away from the paw. - Keep the handle and jaw meshes under that grip. Move the hand in Pose Mode and check that the complete tool follows it.
- Animate the jaw pieces locally. In this shot their closing keys reach the closed pose at frame 355; animate the cut cable section separately afterward.
- Check the contact through the shot camera, including the frames just before and after closure.
This relationship was set through Blender’s Python API in the production script, using parent_type = 'BONE' and parent_bone = 'hand.L'. The screenshot exposes the resulting settings in Blender’s interface so the connection can be inspected without reading the script.
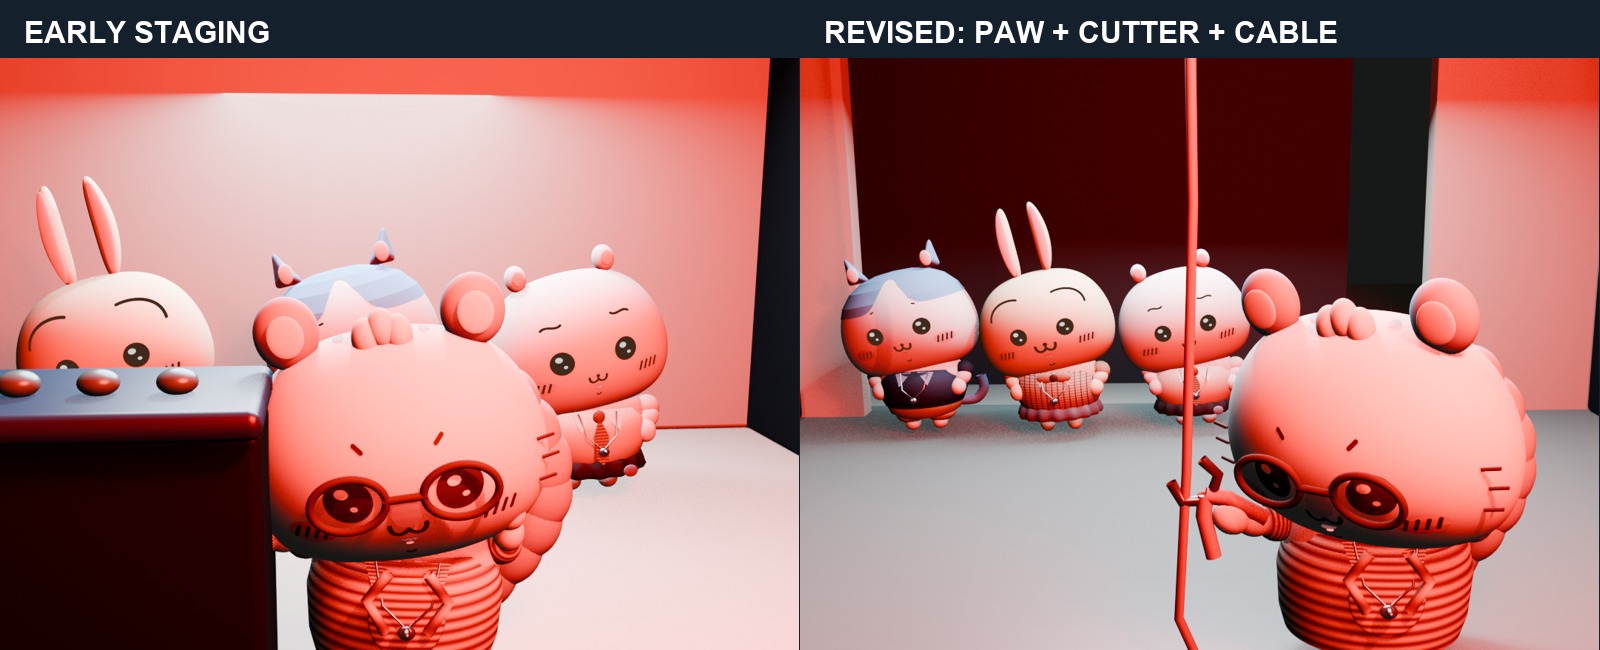
I also turned the head down and toward screen-left, toward the work. The foreground cable bundles moved to the frame edges so they no longer crossed the face and ear. Around frame 355—about 5.92 seconds on this 60 fps timeline—the cutter closes, close to the reference’s lighting transition. These details make the action read as a connected event.
- Contact: the grip meets the paw, and the working wire meets the jaws.
- Direction: the head points toward the work instead of toward the audience.
- Silhouette: spare wires frame the action without covering the face.
- Timing: the jaw closure, cable drop, and lighting cue belong to the same moment.
Camera movement needs a destination
The entrance shot went through a camera correction too. I added four subtle forward dolly accents before the faster portrait approach. The purpose was to let the shot build toward Usagi’s face instead of feeling static and then suddenly cropped.
In Blender, moving the camera changes its position in the scene; changing focal length changes the field of view. For this opening correction, I edited the camera’s Location and Rotation animation channels. The forward motion changes its position, while the rotation keeps the aim on the intended subject. I kept the portrait insert as its own approved moment rather than letting the new approach overwrite it.
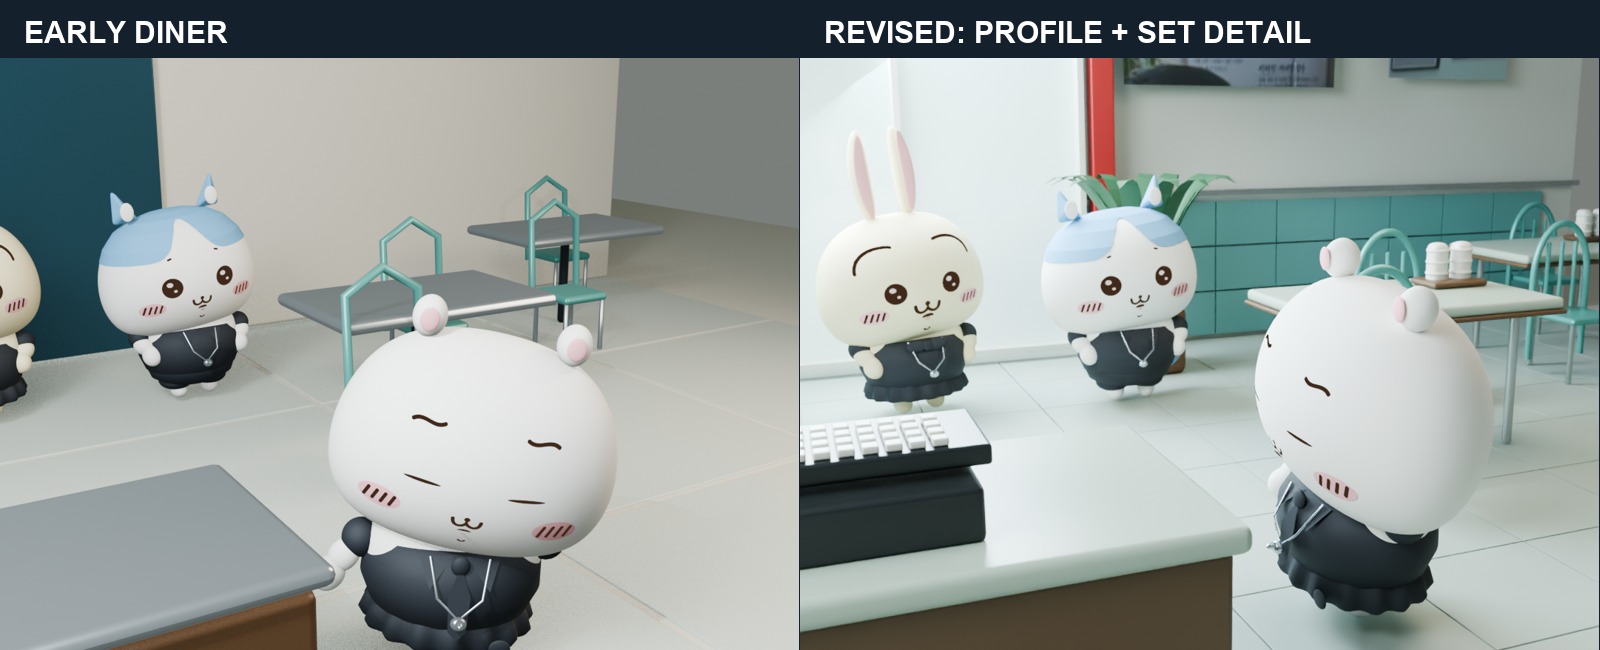
The diner needed a different correction. Chiikawa had to read as a side-facing performer, not another front-facing character. I rotated the character toward a clear left-facing profile—about 86 degrees around the scene’s vertical axis in that setup—and checked the result through the shot camera. A world-axis number alone does not tell you whether a character looks left on screen.
Spend background detail where the shot needs it
The diner’s first pass was too sparse for the reference. I rebuilt the counter area and added a more specific set: pale surfaces, teal wall tiles, tubular chairs, tableware, a register, framed wall details, and tapered plant leaves. Small surface variations helped the plaster, laminate, and wood respond differently to light.
The rooftop used a hybrid approach. I tried a modeled skyline during development, but the final shot uses a photographic background plate cleaned from the reference with AI-assisted image editing. The original people and van were removed from that plate; the characters and replacement van were rendered in Blender. This is why the final result should be described as 3D animation and compositing, with an edited photographic background.
My practical rule is to model what needs to move, change silhouette, receive close inspection, or interact with a character. For a distant background, a prepared plate can be useful if it supports the camera movement you actually need. Check its perspective and lighting against the foreground before committing to a long render.
The floor flicker was a scene-management problem
One of the least glamorous fixes made a large difference to the finished video. A parking deck had been enlarged to 360 scene units and extended across separate sets at the same floor height. Overlapping surfaces competed for depth, producing visible flicker in the entrance and wire-room shots.
The correction was to reduce the deck to 40 scene units and restrict its render visibility to its own parking segment, frames 388–589. I keyed the object’s render visibility (hide_render) so it is hidden outside that range. The important lesson is to inspect an object’s footprint and visibility across the whole production scene: a mesh that belongs to another shot can still interfere with the camera you are rendering now.
For a similar problem, hide suspected floor meshes one at a time, inspect the overlap from the side, and play several consecutive frames. Once you identify the extra surface, correct its extent or shot visibility. A single clean still is not enough to confirm a flicker fix.
I rerendered the 357 affected entrance and wire-room frames, reused the approved portrait and later footage, and preserved the audio. The final checks recorded 720 decoded frames, an unchanged final 300-frame section, and identical audio packets to the previous version. Keeping approved work intact made this a targeted repair rather than another full rebuild.
Assemble for a phone screen, then check the whole twelve seconds
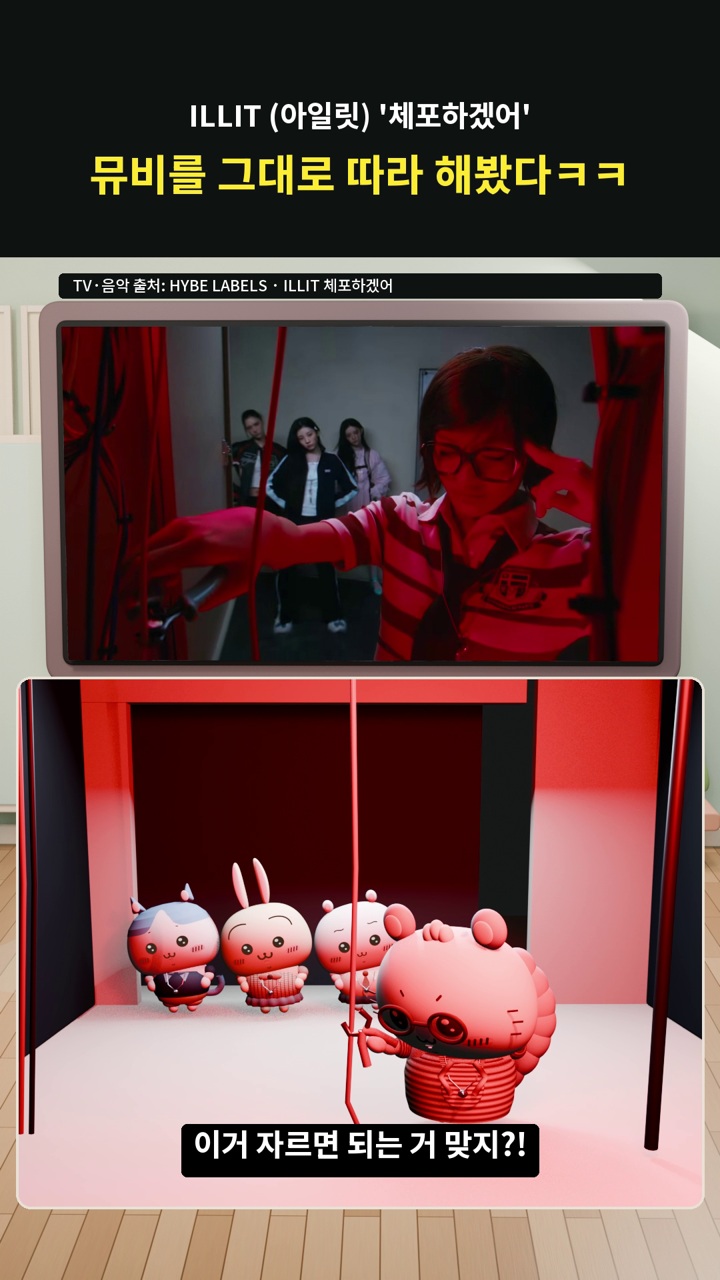
Blender handled the character rigs, geometry, poses, cameras, and rendered scenes. Python scripts helped construct repeated objects and write animation keys; the final editing stage assembled the TV reference, rendered animation, captions, and continuous soundtrack. AI-assisted editing was used for the rooftop plate described above. The staging and corrections were developed through repeated visual review.
For export, this project used 1080 × 1920, 60 fps, and twelve seconds—720 output frames. A 60 fps export gives more temporal samples, but the action still depends on the poses, timing, and contact being convincing.
- Watch once at normal speed to judge the performance and cut rhythm.
- Step through the contact event: before the jaws close, at closure, and after the wire drops.
- Check screen-left and screen-right through the final camera, especially after a cut.
- Look for objects appearing in shots where they do not belong.
- Check several neighboring frames for flicker, and listen across every edit for an audio interruption.
- Review the full vertical composition at phone size, including faces, captions, and the reference TV.
Try one difficult interaction before building your whole Short
If I were starting a similar Blender project again, I would begin with a two-second contact test: a short-armed character reaches toward a prop, looks at it, performs one action, and settles. That small exercise exposes the reach, parenting, camera, and timing problems before they spread across four environments.
The most useful changes in this project were specific: remove the box that distracted from the action, connect the cutter to the paw, aim the head at the wire, make the diner profile unmistakable, and stop a parking deck from entering other shots. Those are decisions you can apply to your own characters, even with a very different visual style.
See those changes in motion: watch the finished Short on my YouTube channel. Pay attention to the wire-cutting moment and the last diner shot, then explore the channel for the next character-animation experiment.
Credits: music-video reference and music: HYBE LABELS / ILLIT, “You’re Under Arrest” Official MV, 0:00–0:12. Original Chiikawa characters: Nagano / ちいかわ. This is an unofficial fan animation and a production breakdown of my own Blender adaptation, not an official collaboration. Comparison panels use saved project renders; interface screenshots show reopened production files with a solid viewport display.